389. Word tips for PhDs (and others)
Anybody working on a research thesis, or any other large document, has to spend a lot of time working on a word processor, usually Microsoft Word. Here are some tips to make things easier and more efficient.
The most important piece of advice I can give you about Word is, learn to use “Styles”. Styles automate the process of managing the formatting of the text in your document (font size, bold, italic, colour, line spacing, etc.). Become an expert in styles as soon as you can, and then use styles for all your formatting in every document you make, especially for headings. Here is a nice video introduction to styles by someone who works at Microsoft:
Styles allow you to ensure that all headings at a particular level have the same format, and they make it easy to be consistent in your formatting throughout the thesis. They allow you to change the formatting of all similar headings at the same time.
If you’ve used styles for your headings then generating an up-to-date table of contents is trivially easy.
For the formatting of normal paragraphs, don’t alter the formatting directly. Do it by modifying the formatting of the Normal style, and applying the style to the paragraph. If this seems a bit strange, have the patience to try it. You’ll appreciate it in the long term.
In a big project, like a thesis, sort out all the formats you are going to use very early on in the project. Define all the formats you will use in appropriate styles in a Word file before you start writing your first chapter (or as early on as you can). It should include Normal Heading 1, Heading 2, Heading 3, Title (for chapter titles), References, and maybe Footnote text, Table text, and Caption text. For the first five of those, modify the standard Word styles of those names to match the formatting you want.
Use that Word file to create all of your chapter files, so that they will all have the same formatting without you having to work at it.
If you’ve already started writing things without using styles, go back and add styles to them.
If the only thing you take from this post is to use styles, I’ve done you a huge favour. Use styles.
Now, some other tips.
Switch on “Show” formatting markers (Ctrl-*). Hold down control and shift and hit the 8 key. (Or click on the paragraph symbol – like a backwards filled-in P – on the Home menu.) Always leave this on so you can keep track of paragraphs and special settings like “Keep with next”.
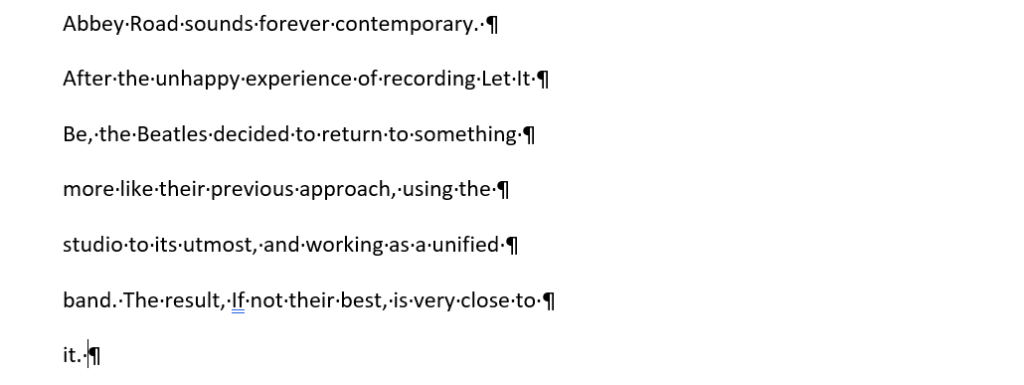
Sometimes it is useful to be able to search and replace invisible special characters in Word. A good example is where you have copied some text into Word and it has a hard return at the end of each line (it shows a backwards filled-in P at the end of each line when you switch on display of formatting markers using Ctrl-*). This means that each line is treated as a separate paragraph and Word loses its ability to format the text appropriately. It might mean that you’ve got a bigger gap than you want between each line, and if you add or delete text, the wrapping around of text gets messed up. To fix this, you can search and replace the invisible hard return character at the end of each line. To illustrate, suppose you’ve got some text that looks like this:
To get rid of most of those hard returns at the end of each line, you could manually edit them out, or you could do this. Select the first six rows – the ones for which you want to get rid of the hard returns. Run Search and Replace (hit Alt-E Alt-E, or hunt for it in the Home menu). In “Find what” type in ^p (it has to be a lower case p) and make sure “Replace with” is empty (or maybe a space, if there isn’t already a space at the end of each line before the hard return). Then select Replace All, and say “No”, you don’t want to apply it to the rest of the document. You end up with this.

If you have text with multiple paragraphs, with a hard return at the end of each line and an extra hard return between paragraphs, here is how you can convert the whole thing to text with just a hard return at the end of each paragraph. Using search and replace, convert ^p^p to ~~ (or something else distinctive) through the whole document, convert all remaining cases of ^p to nothing (or maybe to a space if necessary), and convert ~~ to ^p throughout. Simple!
Other formatting marks you can search for in Word include ^t (tab), ^l (line break or soft return), ^m (manual page breaks),
Learn all about (and use) the paragraph formatting options. Alt-O Alt-P. Or right click on the text and select Paragraph. But if you want to change them in general, do so by modifying a style.
Never use tabs to indent or undent lines, such as at the start of paragraphs or references. If there are going to be indents or undents for many of your paragraphs (e.g., in a reference list), define or edit a style that includes that, and apply it to the paragraphs. Or if it is a one-off thing, use Format|Paragraph|Special|Hanging. For a one-off change, you can also do it by marking the required paragraphs, switching on viewing of the ruler (View | Ruler) and dragging the upper or lower pentagonal (nearly triangular) marker to the desired level of indent.
Never use blank lines to position stuff, especially not to move stuff to a new page. Try not to use page breaks either within the body of a document, except say for a table that you want to be on a page by itself. Generally, it is best to use “Keep with next” (or sometimes “Keep together”) in the paragraph format settings. “Keep with next” is switched on by default in the Heading styles. Be careful not to switch on “Keep with next” except where you really want it. I once saw a thesis that unknowingly had it switched on in every paragraph!
In my view, the master document facility in Word is more trouble than it is worth. Just work on a separate file for each chapter, and when you are in the final stages, combine them all into one big file.
Make sure your pictures and graphs do not “Float over text” as this makes them hard to control. Having them inline like a piece of text makes it much easier to control their position. If you’ve got an object that is floating over the text, you can switch that off by selecting the picture or graph and editing its properties.
It’s best not to construct figures in Word from annotations (lines, boxes, etc.). The formatting of these can get really messy. Instead, construct them in Excel and copy them in or do it in PowerPoint and import the figure as an object. This keeps all the bits together in your Word document.
If annotating a graph or a figure in any way, do it in Excel or PowerPoint before you import it into Word. That avoids having lots of floating objects in Word, which can often be troublesome (e.g., by getting separated from their graph).
If you use page headers in your thesis, the header should not appear on the first page of the chapter. Within File|Page setup switch on “Different first page” before you start creating headers and footers. You will then have to use the page number insertion facility within Page setup to insert a page number counter, and you’ll have to do it twice: once for the first page and once for the rest. If you use Insert|Page numbers in some versions of Word it switches off “Different first page” and you have to start the whole process again. Very annoying.
Overall, it is highly recommended to build up your Word knowledge and skills. The time you invest in it will be repaid many times over, and you’ll be able to draw on the skills for many years to come.
Handy advice, thanks David but here’s some more. Try learning Latex. Many journals have Latex style documents that greatly assist with the learning process and allow you to write your text exactly as it will be published. Latex allows you to cite references and automatically compile the bibliography. It also automatically numbers and keeps track of figures, tables and equations. I switched to Latex after Word had garbled all my equations in Equation Editor twice by muddling the numbers after cutting and pasting. I use Overleaf as a free Latex compiler and converter to .pdf. It has help and also allows collaborative writing. I only use Word these days when I have to read someone else’s document. I never did get to grips with Style sheets. Maybe I should have tried harder!
Hi John. I know some people swear by Latex. I was an early adopter of Latex, back in the days when using Latex required serious commitment and was not at all user-friendly. Eventually I decided that Word was far easier and went back to it. Obviously Latex has moved on since then, but so has Word. I’m not at all tempted to revert to Latex (especially if I need to keep dropping back into Word to read everybody else’s documents). Word does all those things you mentioned pretty seamlessly. If equations matter, and the built-in equation editor is not sufficient (it is for most people), there is an excellent add-in you can get. BTW, style are not “sheets” but are settings attached to each paragraph.
Cheers
Dave
Couldn’t agree more Dave. It’s funny how we are not typically taught these things. I had to explain to a relatively senior academic yesterday how to ensure that Excel doesn’t turn your text into dates (use a ‘ before your text).
Another good reason to use Styles in your documents is that these are recognised by screen readers. If you turn your document into a PDF (make sure to enable the option “Document structure tags for accessibility” when saving as a PDF), then using headers will allow the screen reader to more easily navigate your document.
Another important thing for screen readers is to give your document a title. You can do that under the ‘File’ tab, then go to ‘Properties’ and give the document a Title.
Another tip offered by reader Mike Young:
Learn to automatically insert a hard space between a number and a unit. For example “5 ha” should always be typed as 5(control plus shift plus space bar) ha. By pressing control, shift and the space bar together the 5 is tied to the next word and then forced to stay on the same line.
BTW there is a similar command to tie a hyphen to the letters before and after.
As you say, there are lots of little tricks that are best learned early.